Aim of the Experiment
The purpose of this experiment is to demonstrate that leaves of the same plant have different photosynthetic characteristics depending on the environment in which they grow. Plants have a phenotypic plasticity that allows them to adapt to specific environmental conditions, often to optimize the use of a limiting resource. In this experiment you will compare leaves of the same plant that have grown in high light and low light environments, and will observe that the low light plant has adapted to increase its efficiency of light capture for photosynthesis.
Plants are autotrophic: that is, they do not have to eat food in order to gain energy. They gain the energy they need for metabolic activities by capturing solar energy and converting it into chemical bond energy. This process is called photosynthesis and is carried out mostly in the leaves of a plant. Obviously, the more leaves receiving direct sunlight, the more energy will be captured for growth, reproduction, etc. A three dimensional structure such as a tree has some of its leaves potentially shaded by other leaves. It would be most efficient for a tree to have some mechanism for allowing some sunlight to get past its outermost leaves and stimulate photosynthesis in its interior leaves.
Many species of trees are adapted so that sunlight can penetrate the interior of the canopy and subsequently be absorbed by shaded leaves to maintain a high photosynthetic rate. The relationship between light intensity and photosynthesis is curvilinear; thus, a leaf does not have to be in full sunlight to photosynthesize at a maximal rate. Any leaf receiving about 250 w/m2 of sunlight, even if partially shaded, will photosynthesize as well as leaves that are more exposed.
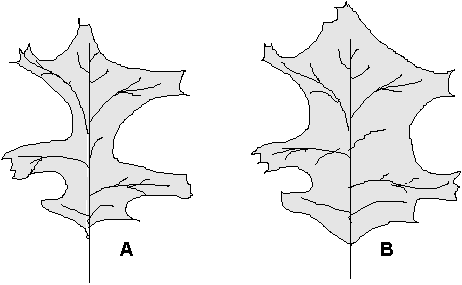
A tree with a large canopy can have adaptations to avoid excessive shading of the interior leaves. One of the ways of helping the entire tree to do maximum photosynthesis would be to have the outer leaves shaped to allow more light into the interior. Leaves in the deeper layers are shaped to intercept most of the fight received (Figure 2). In addition, leaves on the canopy edge have thicker layers of photosynthesizing cells because intense light penetrates the leaf to a greater depth. In this laboratory exercise we will investigate whether or not there is a difference in leaf shape between exterior (sun) and interior (shade) leaves. This portion of the laboratory will be executed by the Bgy 32 class. Additionally the Bgy 32 class will determine the difference in leaf weight relative to leaf size to ascertain if thickness of a leaf correlates to the position of the leaf on the tree. The Bgy 34 class will determine the photosynthetic efficiency of sun and shade leaves. Also, we will use a spectrophotometer to determine if there is a difference in the concentration of chlorophyll, the molecule that is most responsib1e for successful photosynthesis. If we discover a difference, it is our task to decide whether it matches the position of the leaves and helps the tree to perform photosynthesis as well as it can. Finally, it will be your lifelong task to thank a tree each day for providing you with the oxygen you breathe.
Figure 1. Change in leaf shape associated with the position in the canopy. (A) A sun leaf tends to have deeper sinuses; (B) a shade leaf has large lobes and shallow sinuses.
Experimental Procedure:
Each team of students will collect photosynthesis measurements on one sun leaf and one shade leaf from either a Red Maple or Magnolia sun plant. Do not collect these leaves until you are ready to do the actual photosynthesis measurement.
(1) Arrange the components of the Qubit System photosynthesis package as described by the instructor, ensuring that the base of the light fitting is placed 11 cm from the surface of the leaf chamber. Ensure that the light is off by sliding the dimmer control to its minimum setting before proceeding further.
(2) Turn on the computer, and calibrate the O2
and light sensors. Click on the "Start" button to see the outputs of the
two sensors.
Oxygen Sensor: The O2 sensor should read ~20.7% in normal room air. Use a screw diver to adjust he gain control on the amplifier box so that the display on the screen reads ~20.7%.
(3) With the light off, seal a sun leaf inside the leaf chamber so that no part of the leaf is shaded by the O2 sensor or the gas inlet and outlet ports. It does not matter if the leaf is too large to be fully sealed within the chamber, and the "excess" may protrude out of the chamber without influencing your results. When closing the chamber, turn the thumb-screws finger tight only.
(4) Place the petri dish on top of the chamber so that it covers the major part of the leaf area and fill the dish with water.
(5) Click on the "Start" button. The button will change to a "Stop" button, and data will begin to appear on the two graphs on the screen and as numerals on the bottom of the screen. The initial O2 concentration should be close to ~20.7% O2, and the initial photon flux should be close to zero.
(6) Using a drinking straw, inflate a plastic gas bag with your breath being careful not to put pressure on the seams by over-inflating the bag. Seal the bag with the luer lok plug provided. Depending on your metabolic condition, your exhaled breath should contain between 16 and 18% O2, and 3 to 5% CO2. Under normal conditions in humans, one molecule of CO2 is produced in respiration for every molecule of O2 consumed; so if your breath contains 18% O2 it should also contain 2.75% CO2 i.e. atmospheric O2 concentration (20.7%) minus breath O2 concentration (18%) plus the CO2 concentration in the laboratory (typically 0.05%).
(7) Remove the luer lok plug from the tubing on the bag, and attach this tubing to one of the gas ports on the upper surface of the leaf chamber. Press the bag gently so that your breath is flushed through the chamber. After approximately 10 seconds of flushing, remove the bag from the inlet port, seal the bag and seal both ports of the leaf chamber with the luer lok plugs provided. Observe the decline in the O2 reading on the computer screen until this reaches a stab1e value (~4 minutes).
(8) When the O2, reading on the screen has reached a steady value, switch on the light by sliding the dimmer control to its maximum setting. Make a note of the irradiance reading at the bottom of the screen and then turn off the light immediately by sliding the dimmer control to its minimum setting.
(9) Stop data collection by clicking on the "Stop" button on the computer screen. You must now adjust the range of values displayed on the axes of the upper O2 graph so that the lowest value is close to that of your exhaled breath, and the highest value is slightly above that of atmospheric pO2. Using the mouse, click on the lowest value currently displayed on the graph. The value will become highlighted, allowing you to type in a new number. Select a number that is 0.5 units lower than the O2 concentration of your breath. Next, click on the highest number displayed on the O2 axis and change this to 22% O2. Also, adjust the highest value of the light response graph to a value 10 units above the value measured when you turned on the lamp.
(10) Your experiment is in two parts (sun leaf and shade leaf) each of which should take approximately 60 minutes to complete. Adjust the time axis on both graphs to a maximum of 60 minutes by using the mouse to highlight the maximum value present and then typing 60. Press "Enter" or the click the mouse anywhere on the screen to implement the changes.
(12) Illuminate the leaf by sliding the dimmer control to maximum output and observe the changes in the O2 concentration within the chamber. If the leaf has been maintained in near darkness (e.g. room light) prior to the experiment, there will be little change in the O2 reading during the first 3 - 5 min of illumination. This corresponds to the "induction period" of photosynthesis during which photosynthetic metabolites are synthesized until they reach the critical pool sizes required for photosynthesis to occur. Once this has been achieved, the partial pressure of O2 (pO2) in the chamber will increase as O2 is released in photosynthesis. After the photosynthetic induction period, the pO2 in the chamber will rise slowly at first and then will increase linearly.
(13) After observing the linear part of the rise for 5 - 10 min, switch off the light and remove the luer lok plugs from the chamber. Attach the gas bag to a chamber inlet port and flush the chamber for 1 0 seconds by pressing gently on the bag, and then re-seal the chamber and the gas bag with the luer lok plugs.
(14) Switch on the light again, and reduce its output to approximately 80% of the initial intensity. This can be achieved by observing the response of the light sensor display as the dimmer control is adjusted.
(15) After switching on the light, photosynthesis should begin almost immediately, since the leaf is already photosynthetically induced. Measure the increase in pO2 of the chamber for 5 - 10 min. and then repeat step 14.
(16) Reduce the output of the lamp to 60% of initial, and repeat steps 15 and 16 until you have measured photosynthetic rate at a number of light intensities equal to 100, 80, 60, 40, and 20% of the initial light output.
(17) After you have made all your measurements, stop the experiment by clicking on the "Stop" button.
(18) Save your data by clicking on "File" in the menu, and selecting "Save as .. Give your data an appropriate file name, and save it to disk or in the subdirectory allocated for it by your laboratory instructor.
(19) Remove the petri dish from the chamber, detach the leaf from the plant, and detach the leaf chamber from its mounting bracket. Be careful not to touch any hot surface of the lamp or its fitting while doing this. Remove the leaf from the chamber and give this leaf to the Bgy 32 students. These students will now determine the weight and leaf area of this leaf.
(20) Refill the gas bag (if necessary) with your breath and place a shade leaf in the chamber. Repeat steps 12 to 19 above.
Data Analysis
The O2 sensor measures only the partial
pressure of O2 present in the leaf chamber, it does not measure
the rate at which this O2 % produced. The rate of a process,
such as photosynthesis, is expressed as the rate of increase in a product
of that process (or a decrease in the substrate for the process) per unit
time. To measure the rate of photosynthesis in your experiment, you will
need to measure the increase in pO2 within the cuvette as a
function of time. This is achieved by measuring the gradient of the O2
response which, when the X axis of your graphs is presented in min, will
give a rate in % O2 per min. The procedure for analyzing your
data is as follows:
(1) Open the file containing the data collected
for the sun leaf. A command box will appear asking you whether or not you
wish to load the calibration stored with your data file. Answer "Yes".
Your data will appear on the screen exactly as it appeared when you saved
it at the end of the experiment.
(2) Select "Analyze" from the menu by clicking and holding with the mouse. Select "Analyze Data A" and then release the mouse button. A vertical line will appear on your graphs that can be moved along the data points on the graphs by moving the mouse. Note that as you move the vertical line, the digital display on the bottom of the screen will change to show you the exact O2 concentration, illumination and time value at the point on each graph where the line is situated.
(3) Move the vertical line to the point at which you exposed the leaf to high light intensity and answer the following questions:
(ii) Why didn't photosynthetic O2 evolution begin the moment that light was supplied?
(iii) After O2 evolution from the leaf began did the increase in chamber O2 concentration continue in a linear manner or not?
(5) Within the menu select "Analyze" again by clicking and holding with the mouse. Select "Fit" from the "Analyze" menu and release the mouse button. A command box will appear on the lower part of the screen providing you with options concerning the type of mathematical fit that you may wish to apply to your data. The default option is the equation for a straight line (y = bO + b1 * t), denoted by a solid circle at the left-hand side of the equation. If another equation is selected, re-select the linear equation by clicking with the mouse at the open circle next to the equation.
(7) Click on "Results" to obtain a very accurate measurement of b1 and record this in the tab1e in the "Results and Discussion" section.
(8) Click on "OK" to return to the "Fit" command box, and then select "Maintain Fit". The command box will disappear and the screen will have your previously selected data highlighted.
(9) Measure photosynthetic rate at the next lowest light intensity by moving the vertical line to the linear part of the next set of data. Click on a point at the start of the selected data set and hold the mouse button down. The previously highlighted data will disappear. Move the line across part of the data to be analyzed, and then release the mouse button. The equation on the screen will change to reflect the new bO and b1 values for the range of data that you have selected. Select "Analyze" from the menu and then "Fit Results". Record the new value of b1 in the tab1e in the Results and Discussion section.
(10) Repeat points 8 and 9 for each light intensity in your data set, and then repeat the entire procedure using the data set collected with the shade leaf. Express photosynthetic rates for all parts of the experiment in units of m mol O2/m2/sec as described below.
Calculations
Each b1 value from each regression that you performed represents the rate of increase of O2 concentration in the chamber with time. As such, each of these b1 values are rates of photosynthesis expressed as %O, per min. However, photosynthesis is usually expressed in terms of m moles of O2 evolved per unit leaf area per unit time i.e. in units of m mole O2 /m2 /min. To make this conversion the following procedure is required.
Let us assume that the b1 value was X i.e. the O2 concentration of the chamber increased by X% O2/min.
At Standard Temperature and Pressure (STP) 1 m mole of any gas occupies 22.413 m L, so at the temperature T of the laboratory, 10,000X m L of O2 contains:
Let this number = y m moles of O2 (i.e. y is the number of m moles of O2 that were produced per liter of gas in the chamber per minute).
To obtain photosynthetic rate we must now multiply by the volume of the chamber expressed in liters. The chamber is designed so that when closed it has a fixed internal volume of 0.047L. Therefore, in our example, photosynthetic rate would be 0.047 m mole/O2/min/leaf. To express this rate on a leaf area specific basis (e.g. m mole O2/min) it is necessary to divide the value by the area of the leaf (in m2) that the Bgy 32 students have obtained. Record your data in the table provided in the next section.
When you have calculated rates of photosynthesis at each light intensity used in your experiment, present your data as a graph with photosynthesis plotted on the y axis and light Intensity on the x axis. Please turn this graph in with the data sheets at the end of the laboratory handout.
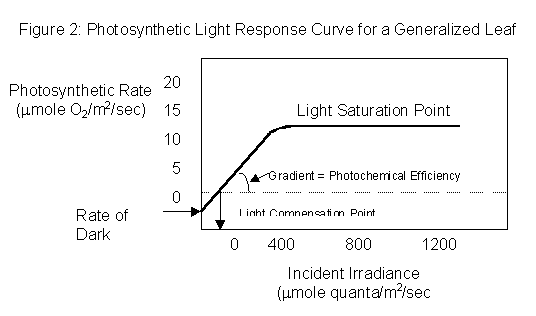
A photosynthetic light response curve for a generalized leaf is shown below. Note that at low light intensities, photosynthesis increases linearly as light is increased. This is because at these intensities the rate of photosynthesis is limited by the rate of the light reactions. Insufficient photons are being supplied to the leaf to produce the ATP and reductant required to sustain maximum photosynthetic rates. At higher light intensities there is less of an increase In photosynthetic rate per unit increase in light intensity, and eventually photosynthesis reaches light saturation at the highest light intensities used in the experiment. Under these conditions, the light reactions of photosynthesis are maximized, and photosynthetic rate is limited either by the Supply of CO2 to supply the photosynthetic dark reactions, or by the turnover rate of the photosynthetic enzymes.
The photosynthetic light response curve of a particular plant is influenced by many factors, and a study of the components of the curve can tell us a great deal about the physiology and ecophysiology of the plant. Important aspects of the light response curve are listed below. Questions may be answered on the laboratory report form at the end of this laboratory handout.
(ii) The Rate of Dark Respiration: If the linear part of the light response curve is extrapolated to intercept the y axis at zero light intensity, the negative rate of photosynthesis at this point gives an estimate of "dark" respiration rate. Criticize this method for estimating dark respiration and suggest a way in which it may be measured directly.
(iii) Photochemical Efficiency: Photochemical efficiency may be defined as the increase in photosynthetic rate achieved per unit increase in light absorbed by the leaf. In your experiment, you did not measure light absorbance by the leaf, but only the amount of light transmitted through the leaf. However, a qualitative measurement of photochemical efficiency may still be made by calculating the initial slope of the light response curve. Discuss how you would change the design of the experiment to make more accurate measurements of photochemical efficiency.
(iv) The Light Saturation Point of Photosynthesis: The light intensity beyond which the light response curve plateaus is called the light saturation point of photosynthesis. At this point increases in light intensity do not cause increases in photosynthetic rate, so other factors apart from the supply of light must be limiting the photosynthetic process. These factors include:
(ii) The ability of the leaf to transduce the light energy supplied into chemical energy for photosynthesis (dependent on the photophosphorylation capacity of the leaf.
(iii) The capacity of the leaf to use energy from photophosphorylation to fix CO2 (dependent on the amount, and turn-over rate, of enzymes involved in the "dark reactions" of photosynthesis).
3. Quantitation of Chlorophylls a and b ratios by Spectrophotometry
Although most plant leaves appear green to our eyes, several pigments of different color are usually present in the chloroplasts of green leaves. The chlorophylls a and b provide the green color and absorb the light energy needed for photosynthesis.
Closely associated with the chlorophylls in the chloroplast are another group of pigments, the carotenoids; they are yellow to red in color and likely play a role in the gathering of light energy for photosynthesis. The carotenoids also help to protect the chlorophylls against photooxidation.
Chlorophylls a and b are tetrapyrrole pigments that contain Mg2+ as a centrally chelated metal. Although the structures are otherwise identical, chlorophyll a has a methyl group in the position where chlorophyll b has a formyl group. The methyl group gives chlorophyll a slightly more affinity for non-polar, relatively hydrophobic solvents than chlorophyll b. This difference in affinity allows their separation by chromatographic techniques and results in a slightly different absorption sectrum which we will use for the quantitation of chlorophyll a and b.
Chlorophyll Extraction:
1. Keep your sun and shade leaf samples separate
through out this portion of the experiment. Cut up the sun or shade leaf
into small pieces and weigh them.
Shade Leaf Weight:_______________________
3. Place this extract in a centrifuge tube and centrifuge the extract for 2 minutes at 2500 RPM.
4. After centrifugation, use a Pasture pipette to transfer some of the acetone extract to a glass spectrophotometer cuvette. You will need to fill the cuvette 1/2 to 2/3 full.
5. Use acetone as a blank to calibrate the spectrophotometer. Measure the absorbance of the Chlorophyll a solution at 663 nm and of the Chlorophyll b solution at 645 nm. Record your data in the following chart.
|
|
|
|
| Absorbance at 663 nm Chlorophyll a | ||
| Absorbance at 645 nm Chlorophyll b |
CALCULATIONS
The higher the concentration of a pigment in a solution, the larger the proportion of light that will be absorbed by the sample at a given wavelength. This relationship is expressed quantitatively by the Beer-Lambert law:
A = e Cl or C =A/e l
e = the millimolar extinction coefficient, which depends on the material and the wavelength and relates the other quantities to each other, in units of L / mmol-cm.
C = the concentration in solution (mmol/L)
l = the light path length (cm)
CChla =A663 / (75.05 L/mmol-cm)(1cm) and CChlb =A645 /(47.0 L/mmol-cm)(1cm)
Give the concentration of these pigments in the acetone solution in units of mmol/L or m mol/L.
Since we want to determine the amount of chlorophyll
as a portion of the fresh tissue, we must take into account that this sample
was dissolved in 10 ml of acetone, and that this contained all the pigments
from weighed sample of leaf tissue. Therefore:
amount of
Chl a =[A663 / (75.05
ml/m mol-cm)(1 cm)]
X 10 ml X total tissue weight in grams
Source of Plant Material (i.e. the tree): ___________________________
|
|
|
|
| m mol/g fresh weight Chlorophyll a | ||
| m mol/g fresh weight Chlorophyll b | ||
| Ratio of Chl a / Chl b |
Sun vs. Shade Leaves
Worksheet for Results and Discussion
Group Members:
______________________________
______________________________
______________________________
Date: ______________________
Part 1: Leaf temperature and transpiration measurements
Tree species being sampled: _______________________________________
|
|
|
|
|
|
|
|||
|
|
|||
|
|
|||
|
|
|||
|
|
|||
|
|
|||
|
|
|||
|
|
|||
|
|
|||
|
|
|||
|
|
|||
|
|
|||
|
|
|||
|
|
|||
|
|
|||
|
|
|||
|
|
|||
|
|
|||
|
|
|||
|
|
|||
|
|
|||
|
|
When you are done, please share your averages with
the class.
|
|
|
Diffusion Rate (mmol/m2/sec) |
(oC) |
Light Fluence (m mol/m2/sec) |
| Group 1 Maple | Sun | |||
| Shade | ||||
| Group 2 Maple | Sun | |||
| Shade | ||||
| Group 3
Maple |
Sun | |||
| Shade | ||||
| Group 1 Magnolia | Sun | |||
| Shade | ||||
| Group 2 Magnolia | Sun | |||
| Shade | ||||
| Group 3 Magnolia | Sun | |||
| Shade |
1. What conclusions can you make about leaf diffusion rate (transpiration), leaf temperature, and light fluence (intensity) in the sun and shade leaves from these two plant species? What might be the purpose of transpiration? Use your textbook to help answer this question.
|
|
|
|||
|
(m mol quanta/m2/sec) |
|
(m mol O2.m2.sec) |
|
(m mol O2.m2.sec) |
Please remember to turn in your graph
2. Criticize this method for estimating dark respiration and suggest a way in which it may be measured directly.
9. Can you identify any non-physiological adaptations of shade leaves to lower light environments?
Source of Plant Material (i.e. the tree) _____________________________
Shade Leaf Weight: ______________________________
|
|
|
|
| Absorbance at 663nm Chlorophyll a | ||
| Absorbance at 645nm Chlorophyll b |
|
|
|
|
| m mol/g fresh weight Chlorophyll a | ||
| m mol/g fresh weight Chlorophyll b | ||
| Ratio of Chl a / Chl b |
Class Data:
| Tree | Habitat | Ratios of Chl a /Chl b |
| Group 1 Maple | Sun | |
| Shade | ||
| Group 2 Maple | Sun | |
| Shade | ||
| Group 3 Maple | Sun | |
| Shade | ||
| Group 1 Magnolia | Sun | |
| Shade | ||
| Group 2 Magnolia | Sun | |
| Shade | ||
| Group 3 Magnolia | Sun | |
| Shade |
10. Did you see a difference in the concentration of chlorophyll a and chlorophyll b in the different leaves? Using your textbook as a reference, what might you conclude about the observed differences?
| Tree | Leaf |
|
(cm2) |
(cm2/gm) |
| Maple | Sun | |||
| Shade | ||||
| Maple | Sun | |||
| Shade | ||||
| Magnolia | Sun | |||
| Shade | ||||
| Magnolia | Sun | |||
| Shade |
12. What trends do you see in the leaf area, fresh weight, and dry weight of the sun and shade plants? Using your textbook as a reference, explain these differences and their importance to maximization of photosynthesis in sun and shade leaves.